Yes, I seem to be missing in action quite a bit, but I am still here. I've got completed recipes stacked up, ready for posting, I've just been lacking the time to get to them. Between work and quite possibly the most active 3 1/2 year old on the planet, I can't seem to find the time to put together a blog entry that I find acceptable enough to post.
So, if you check here from time to time, please continue to do so. I'm still out there. In the meantime, I'm visiting all the wonderful blog sites out there, looking for inspiration for some of my future posts.
Thursday, September 16, 2010
Sunday, May 30, 2010
Powerhouse Muffins

Okay, so after my last post, you may find yourself looking for something a little less fattening. I don’t blame you. Just looking at the ingredient list for a great homemade ice cream, you can almost feel the pounds packing on. Well, I do like a good quality full-fat treat from time to time (sometimes maybe a little more than others), but I’m also interested in keeping things healthy as well. Unfortunately, as everyone knows, life is busy, which makes it much more difficult to work in those healthy choices. There is often little or no time to spend preparing healthy, and let’s not forget tasty, dishes at home. The fast-food, drive-through generation really got its start when I was a kid; and I’m a bona fide product of that generation. Add to that a 3 year old daughter at home, a busy work schedule, gatherings with friends and family and the fact that I have been going to the gym 4 days a week for the last year (go me!), I find myself stuggling to find the time to whip up the foods that would be best for our family.
Thus began the search for some healthier grab and go options. I like to peruse the isles at the grocery store for quick-fix meal choices to fit an on-the-go lifestyle. The last 5 years or so have seen some really nice options become available. From healthier breakfast bars, natural and even organic pre-packaged snacks and pre-prepared meals in the freezer that are a far cry from questionable fried chicken and watery instant potatoes. No, the market has responded well to the demands of the consumer. We want some better choices. Yes, the ‘processed’ foods that crowd the shelves at the supermarket probably won’t go away any time soon, for they do fulfill the wants of the average Americans who want it fast, tasty and cheap. And quite honestly, cheap does not fit the description of the healthier choices that are available. I don’t know if it’s because they don’t sell as much, or perhaps that they use fewer (if any) artificial additives to help preserve and stabilize them, but you can definitely expect to pay a premium for those ‘better’ choices.
It seems like almost every entry I add to this blog includes a line where I state that I am not a fan of some particular food. Well, this entry will be no exception, though it’s not a particular food, so much as the re-use of certain foods. I am not a big fan of leftovers. No, I pretty much get my jollies out of a dish the first time around. I simply can’t count myself among those who say that certain foods get better after they’ve sat out some time in the refrigerator. If that was true, then why aren’t restaurants capitalizing on this concept? I can just see the name now: “‘Seconds’ Because fresh is just okay” Or maybe: “‘Leftovers’ Nobody wanted it yesterday, maybe it will be better now”.
Okay, okay. I realize that eating something that’s been stored for future use doesn’t have to be a complete bummer. I’m really trying to get into the habit of making meals that can feed a family for at least 2 meals, which really cuts down on the amount of time to prepare, as well as the amount of waste. So, I decided to go on the hunt for a breakfast item that I could make ahead, would be quick and easy on the day I need it, and would be tasty to boot. I really like muffins, so I figured that would be the direction to take. I did know that muffins typically freeze well, so this should be no problem. I was wrong.
‘Healthy’ muffins. You know, there are really quite a few recipes out there in cyberspace for ‘healthy’ muffins. You can find them just about anywhere you look. A comparison of the varied types available will show some similarities: No white flour, they almost always include one ingredient with the word ‘bran’ in the name, they can include a wide variety of so-called ‘healthy’ add-ins like protein powder or flax seeds. Yes, there is no end to the combinations of healthy ingredients that people can throw together. And you know what, some of them really taste horrible. I can’t quite figure it out. The authors of the recipes make them sound amazing, even going as far to say they are just like eating a ‘real’ muffin. Yeah, right. I’ve tested numerous recipes over the years only to find out the hard way that regardless of the ingredients, they all pretty much taste like wet cardboard. The people who say they taste awesome, and even like a regular muffin? They probably started their lives as cattle, chewing on the grass out in the field, because these things just stink.
So, I present to you one recipe that I think does not stink. I won’t promise it tastes like a nice Blueberry Muffin from Starbucks with the tasty crumb topping and the too-high-to-mention calorie count. I will promise you that it does contain many of those good-for-you ingredients (including flax seed) and, in my opinion, do taste just a bit better than wet cardboard. The fact that I’ve made these more than once, the fact that I continue to eat them, and the fact that my wife and daughter both like them is testament to their goodness.
I’ve modified this recipe from a number of different recipes to come up with a muffin that really reflects our personal tastes. The only thing (that I know of) that is truly unique is the name I gave the recipe. This recipe can be altered to fit your personal desires or even for food allergies. Want to add nuts? Go ahead. Want to add a different fruit, more fruit, less fruit? Be my guest. The point is, if you can find something you like, perhaps by making changes to this recipe, and create something to put on your plate that will encourage you to replace a few more of those ‘fast food’ meals, you will have made a positive step in the right direction.
By the way, I would also like to take a moment to offer a word of advice - if you have a chance to have some little helping hands assist you with your baking, you will find it quite rewarding.
Powerhouse Muffins
Makes approximately 24 muffins
1 cup Whole Wheat Flour
1 cup Oat Bran
1 cup ground Flaxseed (see note below)
1 ¼ cups Brown Sugar (light or dark)
2 tsp Baking Powder
2 tsp Baking Soda
½ tsp Salt
2 tbsp Cinnamon
1 ¼ cups Pureed Carrots or 1 ½ cups Shredded Carrots (see note below)
2 – 3 medium Apples, finely shopped or shredded
3/4 cup 1% or Nonfat milk (see note below)
2 large Eggs, beaten
2 tsp Vanilla extract
Other fresh or dried Fruit or Nuts at your discretion
Pre-heat oven to 350 degrees F. Prepare 2 muffin pans with paper or foil muffin liners.
Mix flour, oat bran, ground flaxseed and other dry ingredients in a large bowl. Add carrots and apples (if adding nuts or dried fruits, do so at this time). Mix the dry ingredients well.
Stir together the eggs, milk and vanilla. Add to the dry ingredients and mix until well moistened. If adding fruit such as fresh or frozen blueberries, stir them in now.
Fill the muffin cups almost to the top, about 3/4 to 7/8 full. Bake for 20 to 25 minutes or until a toothpick inserted into the muffins comes out clean.
Notes:
Ground flaxseed meal goes bad very quickly. If at all possible, purchase whole flaxseed in the bulk food section of the local supermarket and grind it yourself. To grind, use a blender or an electric coffee grinder (clean). Process to a fine meal, but stop short of making flaxseed butter.
I prefer using carrot puree as I don’t care for the texture of the shredded carrots – you decide. If you choose carrot puree, approximately 3 containers of carrot puree baby food will work very well. Because of the added moisture, cut the milk to ½ cup.
These muffins freeze very well. Just let them cool, then place them in either a gallon size ziplock bag or individual ziplock bags. I just take them out of the freezer the night before. They are good cold, even better warmed in the microwave. I like using foil cupcake liners as they tend to release the muffin easier – and this is a sticky batter.
The number of muffins you get from this recipe will vary depending on the amount of additional fruit or nuts you add to the batter.


Tuesday, May 18, 2010
Snickerdoodle...Ice Cream
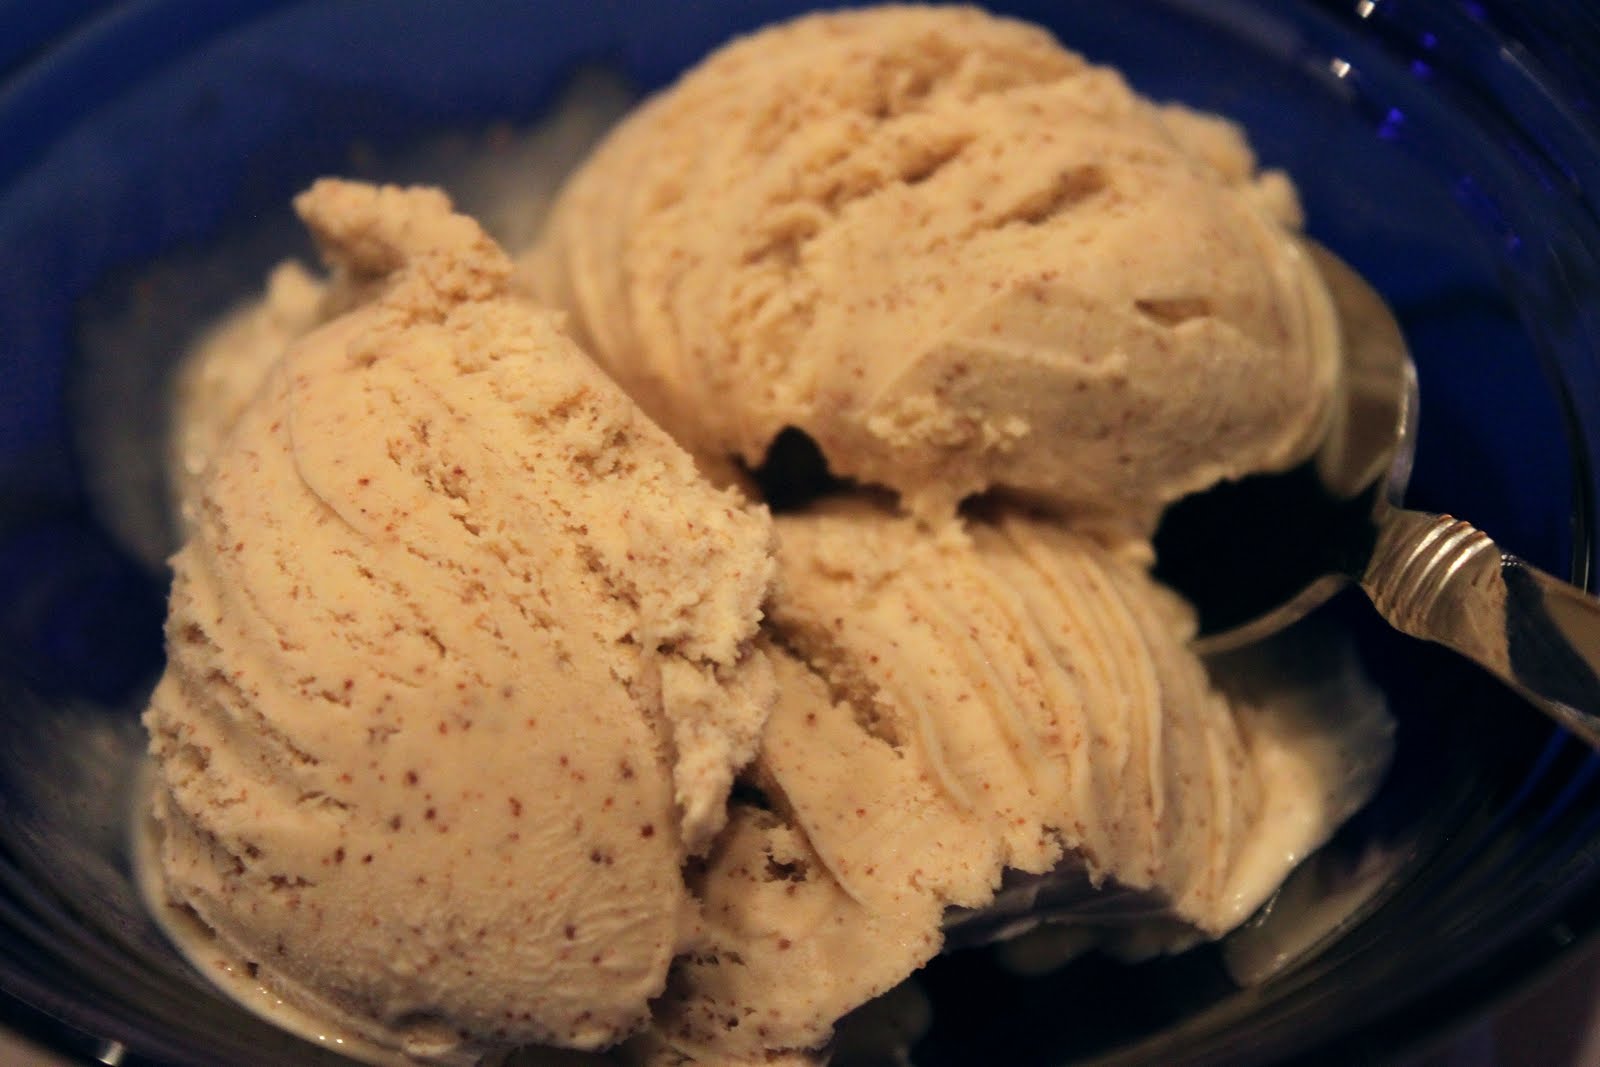
Well, not exactly Snickerdoodle Ice Cream, but pretty darn close. We just got back from a vacation (working vacation for me) in Central Oregon. I had hoped to have some time to work in some long-delayed baking projects. Unfortunately, I didn’t get as much time as I had hoped. I did, however, manage to work in this tasty little treat, one I had wanted to try for awhile now.
I first tried my hand at homemade ice cream a few years ago after receiving a new ice cream maker for Christmas. Now, let me just say that I am not a huge fan of ice cream. It’s not something I typically crave, but I do enjoy now and then. I should also admit that I am one of those oddballs that doesn’t like to have a scoop of ice cream served with cake or pie. The only time I’m interested in cake and ice cream together is the Cake Batter Ice Cream they serve at Cold Stone, but I digress…
After making my first few batches of ice cream in my new maker awhile ago, I found that it would be almost impossible to match the creamy goodness that is homemade ice cream with anything I could purchase at a supermarket or even many ice cream shops. No, the stuff from home is so much better. Unfortunately, it is also just a bit time consuming. If you have the time, however, it is well worth the investment to try it yourself.

For this batch, I had actually intended to make a different recipe, but I was lacking some of the necessary equipment. You’ll just have to wait for a later post to learn about that one (tease tease). For now, I decided to try a recipe I found on Allrecipes.com for Cinnamon Ice Cream. The recipe was highly rated on the site and was just different enough from the ‘usual’ ice cream recipes that it was worth a shot.
I have to tell you, it is good. It probably won’t cause me to start craving ice cream, but it is quite delicious. Oh, and if you are counting calories, you can stop here, this is not a low-fat, low-cal ice cream. It is however, creamy, sweet and cinnamony. And a fair warning, a little bit goes a long way. For me, the almost cloyingly sweet goodness was well balanced with a nice cup of strong black coffee.
So there you have it. If it’s time you dug out your rusty old ice cream maker in preparation for summer, give this recipe a try. Don’t like cinnamon? The base custard recipe would work well for any number of flavor additions. My wife suggested an addition of some chunks of sugar cookie dough, which would probably make this just about perfect. Too bad I didn't have any to add at the time. Oh well, maybe next time around. For you, go nuts (or maybe add some, if you like).
Cinnamon Ice Cream (courtesy of Allrecipes.com)
1 Cup White Sugar
1 ½ Cups Half and Half
2 Eggs, beaten
1 Cup Heavy Cream
1 Teaspoon Vanilla Extract
2 Teaspoons Ground Cinnamon
In a saucepan, over medium-low heat, stir together the sugar and half and half. When the mixture begins to simmer, remove from heat and whisk half of the mixture into the eggs. Whisk quickly so that the eggs do not scramble. Pour the egg mixture back into the saucepan, and stir in the heavy cream. Continue cooking over medium-low heat, stirring constantly, until the mixture is thick enough to coat the back of a metal spoon. Remove from heat, and whisk in vanilla and cinnamon. Set aside to cool.
Pour the cooled mixture into and ice cream maker, and freeze according to the manufacturer’s instructions.
Erik’s added tips and notes:
I would strongly suggest running the custard mix through a fine-mesh strainer before processing to remove any large bits of cooked egg that may have occurred during the tempering process. Refrigerate the custard for several hours before adding it to your ice cream maker. If you do want to add nuts, cookie dough bits, etc., do so at the end of the churning process. Be sure to freeze the finished ice cream for several hours before eating to allow it to set up properly, as well as to allow the flavors to fully develop.
Want a closer look at the photos below? Just click on them for a larger view.


Monday, April 26, 2010
Some Photos to Enjoy
While I prepare some baking/cooking posts for my return, I thought I'd start by throwing out some photos for you to enjoy.
These photos were all taken at the Wooden Shoe Tulip Festival in Woodburn, OR. This month-long event happens every year in April and is a wonderful showcase of some of the finest tulips available anywhere (yes, we can even rival Holland). I should also mention there are some fine opportunities to taste local foods and wines as well, just in case the flowers aren't enough.
Enjoy.
Erik - Baking in Oregon


Friday, April 23, 2010
Baking in Oregon is Returning!
You heard it here first! Baking in Oregon, after more than a 1-year hiatus, is returning!. Add to that, I am coming back to the original site on Blogger after a stint with another blog hosting site (improvements to the posting software being the primary reason for the change).
I hope you'll join me once again as I roll out the posts, slowly for now, and get engaged once again in the blogging community. I've really missed posting to my site. I've continued to bake, but life's obligations took some of the free time away that I needed to post regularly to the site. Rather than post once every 3 months, I felt it was best to let things go silent for awhile.
Keep your eyes open for my first blog post coming soon. In the meantime, look over some of my old posts here, or, you can jump over to my other Baking in Oregon site here. That site will remain up as an archive to some previous posts.
I hope to hear from some of you soon!
Erik
Baking in Oregon
Monday, June 2, 2008
A Need to Knead...
 Last year on this blog, I wrote a post about conquering one of my baking fears: Cheesecake. All went well and my first cheesecake turned out, dare I say it, nearly perfect. Knowing I had that accomplishment behind me, I decided to attack another one: Bread.
 Now, why should bread be a big deal? We eat it all the time, it's everywhere, and even a machine on your countertop can make it with very little input from you. Well, for me, the yeast and the kneading are those components of breadmaking that worry me. As a reminder, the reason I have any fears in baking are this: I hate to fail. I have this need to do things right the first time, I hate do overs. Is that realistic? Is it reasonable? Not really, it's just me. Unfortunately, not only do I hate to fail, I know I'm going to fail at certain things, so I tend to play it safe in the kitchen and avoid those things that lead to failure. My big 3 fears as I learn more about baking are these: Cheesecake, Bread and Pie Crust. Now, I know some of you reading this probably look at this list and laugh, thinking, "those are so easy, no problem". Well, for some of you, I'm sure they are quite easy, and, as I said, the cheesecake turned out to be no problem at all. But I don't have anyone training me, I'm learning from books, TV and the internet, which, while good, just isn't the same as hands on training. Nevertheless, I needed to move on, and King Arthur Flour gave me the little boost to get rolling.
The Baker's Banter blog at King Arthur Flour had a post for High-Fiber Cinnamon Swirl Bread. It looked really good, and the step by step posts on the blog made it look fairly easy. So I decided to give it a try. Having made scones using my food processor to do the dirty work, I was looking forward to baking bread using my trusty Kitchen Aid Mixer for my mixing and kneading. Only problem, we're out of town on vacation, and though I have a full kitchen at my disposal, I didn't have my stand mixer. So, hand mixing and kneading it would be.
I mentioned one fear of mine being yeast. Seems simple enough, but I get caught up with activating the stuff and the different types I find at the store: Active, Rapid Rise, Instant. I just followed the directions on the recipe and I had a beautiful, bubbling little blob to start my recipe. No problem, the little buggers did fine. As for the kneading, well, I consulted some of my references and dove in hands first. The only thing I wasn't sure about was how long to knead. I know both under kneading and over kneading can cause problems for a recipe, but I seemed to recall something about kneading for about 15 minutes. Right or wrong, I decided to play it a little safe and go for 12 minutes because I have pretty strong hands and was probably working it fairly hard.
Well, long story short, I was pretty pleased with the end result. The loaf wasn't beautiful, but it did rise, had good texture and tasted and smelled wonderful. Good stuff. Fear of breadmaking can now be put aside. I'll be more likely to try some bread recipes now that I have performed this task without a major failure. Thanks KAF for giving me the inspiration to tackle the second of my baking fears. The last remaining, pie crust. Stay tuned.
High-Fiber Cinnamon Swirl Bread from King Arthur Flour
Dough:
2 tsp instant yeast or active dry yeast
1 cup (8 ounces) lukewarm water
1/3 cup (2 5/8 ounces) unsalted butter, softened or melted
2 cups (8 1/2 ounces) King Arthur, Unbleached All-Purpose Flour
1 cup (4 2/4 ounces) Hi-Maize
1 1/4 tsp salt
1/4 cup (1 ounce) Baker's Special Dry Milk or 1/4 (5/8 ounce) nonfat dry milk
3 tbsp (1 1/4 ounces) sugar
Filling:
1/4 cup (1 3/4 ounces) granulated sugar
1 1/2 tsp ground cinnamon
2 tsp King Arthur Unbleached All-Purpose Flour
1 large egg beaten with 1 tbsp water, to brush on dough
- If you're using active dry yeast, dissolve it with a pinch of sugar in 2 tablespoons of the lukewarm water. Let the yeast and water sit at room temperature for 15 minutes, until the mixture has bubbled and expanded. If you're using instant yeast, you can skip this step.
- Combine the dissolved yeast (or instant yeast) with the remainder of the ingredients. Mix and knead everything together - by hand, mixer or bread machine set on the dough cycle - till you've made a smooth dough. Adjust the dough's consistency with additional flour or water as needed; but remember, the more flour you add while you're kneading, the heavier and drier your final loaf will be. If you're kneading in a stand mixer, it should take about 5 minutes at second speed and the dough should almost clean the sides of the bowl, perhaps sticking a bit at the bottom. In a bread machine (or by hand), it should become soft, smooth and elastic.
- Place the dough in a lightly greased bowl. Cover the bowl, and allow the dough to rise, at room temperature, for 1 to 2 hours, or until it's nearly doubled in bulk. Rising may take longer, especially if you've kneaded by hand. Give it enough time to become quite puffy.
- While the dough is rising, make the filling by whisking together the sugar, cinnamon and 2 tablespoons flour.
- Gently deflate the dough, and transfer it to a lightly greased work surface. Gently stretch and pat it into a 6" x 20" rectangle.
- Brush the dough with the egg/water mixture; you won't use all of it, but save what's left. Sprinkle the dough evenly with the filling, leaving one short end bare.
- Starting with the short (6") end covered with filling, roll the dough into a log. Pinch the ends to seal, and pinch the long seam closed.
- Transfer the log, seam-side down, to a lightly greased 8 1/2" x 4 1/2" (medium) loaf pan. Tent the pan loosely with lightly greased plastic wrap.
- Allow the bread to rise till it's crested about 1" over the rim of the pan, about 1 hour. Again, it may rise more slowly for you; let it reise till it's 1" over the rim of the pan, even if that takes longer than an hour. While the dough is rising, preheat the oven to 350 degress F.
- Brush the top of the bread very lightly with some of the reserved egg/water mixture, and sprinkle with additional cinnamon-sugar. Bake the bread for about 40 minutes, tenting it lightly with aluminum foil after the first 20 minutes. The bread's crust will be golden brown, and the interior of the finished loaf should measure 190 degrees F on an instant-read thermometer.
- Remove the bread from the oven, and loosen the edges with heatproof spatula or table knife. Turn it out of the pan onto a rack. Allow the bread to cool completely before slicing.
Additional notes on my loaf: I didn't have an 8 1/2" x 4 1/2" loaf pan available, so I used a 9" x 5" and it seemed to work fine. I didn't have Hi-Maize, so after checking with KAF, I added a 3rd cup of AP flour in place of the Hi-Maize. To help improve my rising since I was kneading by hand, I let the dough rise in a gently warmed (but off) oven. For my preference, I might add a little more of the cinnamon/sugar mixture inside my loaf. Finally, my load deflated a bit on one side - I'm not sure why, I may have bumped it when I was getting ready to put it in the oven. Overall, it was fantastic. Below are some photos of the process:


Activating the yeast.
Getting ready to mix the ingredients.

Ready to rise.

Spreading the cinnamon/sugar.

Sealing the seam.

The finished loaf. The hole is from the thermometer.

Another view.

The inside - for a first ever loaf of bread, I'm pleased.
Wednesday, September 12, 2007
Apples and Scones - Irish Style?

One of the fun parts about baking for me is exploring my family roots through food. Like many Americans, I have a bit of a 'Heinz 57' heritage - a little bit of everything. I've done some family history research and have found some interesting things - I have relatives that came over on the Mayflower (fully documented, I am a member of the Mayflower Society), which came over from England. I have family that emigrated from Denmark and Germany. My two strongest ties, however are to Ireland (I still carry that family name) and Sweden (I still have family with whom I am in contact there). Since my grandmother and aunts were born in Sweden, I grew up exposed to many of the wonderful foods of that country - in fact, I plan to use them in several blog posts to come (although I can guarantee that Herring Pudding will never grace this blog site - yech!!). That being said, I have no expressions of the Irish side of the family - most of my ancestors died very young and lived under very tough and poor conditions once they came to the US, so they didn't take much time to record information to pass down the line. So, my list of Irish family recipes is fairly short - zero. I'm very interested in knowing more about what my family may have been eating some 100 years ago when they emigrated - as well as what the Irish people in general like to eat.
I've found a number of recipes online that claim Irish heritage or at least popularity, but it can be difficult sometimes to sort out the truth from the other stuff out there in cyberspace. Maybe some of my visitors can recommend some good sites for Irish recipes and history?
In the meantime, as I take a short vacation on the Oregon Coast, I begin looking ahead to the change in seasons to my favorite time of year - Fall. I love the weather, cool, foggy, crisp, clean. When I sense those changes coming, I can't help but begin thinking of fall cooking - comfort foods - and for me, my favorite Fall ingredient has to be apples. Of course, we can get apples here year-round, but fall is the time when the best of the harvest come in and everyone's thoughts start to turn to baking with apples.
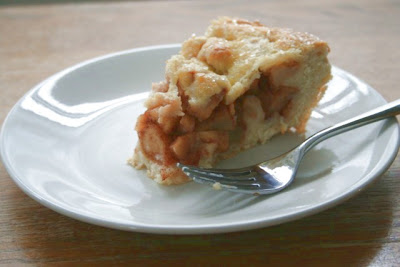
So, looking at my pile of fresh Granny Smiths, and considering how I might explore some of that Irish heritage, I came across a recipe on Joyofbaking.com for an Apple Scone Cake. Now, if the description of this recipe as posted on Joy of Baking is to be believed, the Apple Scone Cake is one of the most popular desserts made by home bakers in Ireland (can anyone confirm that??). It certainly sounded like an interesting recipe to try - and, for all I could tell, seemed as if it could be a real 'Irish' dessert. Why not give it a try? The concept is interesting - it's not really a 'cake' as I would think of it - it's really more of a cross between a cake and a pie. Imagine apple pie, but instead of the traditionally flaky pie crust, a more 'cakey' scone crust instead. Since I'm not yet experienced in the fine art of pie crust, but have successfully made scones, this seemed like a great gateway recipe to my first ever 'pie'
Overall the results were very good. Having made this, I would probably make the following changes the next time around: a bit more sugar/cinnamon in the apples - I used more apples than the recipe called for, but didn't add more sugar to account for that change. Second, I would bake it just a bit longer - I like my apples a bit softer, but this was still pretty good. Third, I might add just a few small pats of butter (not margarine) in with the apples. Lastly, I might add just a touch more sugar to the scone base. With all of that being said, I am including the full original recipe with no modifications so you can start at the same point as me. This is a hearty and tasty dessert - perfect for a cool fall evening - I will definitely be making this again.
Apple Scone Cake (originally from Joyofbaking.com)
2 Cups (280 grams) All Purpose Flour
1/2 Cup (100 grams) Granulated White Sugar
1 Teaspoon Baking Powder
1/4 Teaspoon Salt
1/2 Cup (113 grams)(1 stick) Unsalted Butter, Cold and cut in pieces
2 Large Eggs, Divided
1/2 Cup (120ml) Milk, Divided
1 Teaspoon Pure Vanilla Extract
Filling:
1 Pound (454 grams) Granny Smith Apples, peeled, cored and cut into 1 inch (2.54cm) chunks
2 - 3 Tablespoons (30-45 grams) Granulated White Sugar
1/4 Teaspoon Ground Cinnamon
Garnish:
Granulated White Sugar
Preheat over to 350 degrees F (177 degrees C) and place rack in the center of oven. Butter (or spray with nonstick cooking spray) a 9-Inch (23cm) glass pie plate.
In a small bowl, whisk together one egg and 1 tablespoon from the 1/2 cup milk. Set this aside for later use as a glaze for the top of the cake.
In a large bowl, whisk together the flour, sugar, baking powder and salt. Cut the butter in small pieces and blend into the flour mixture with a pastry blender or two knives. The mixture should look like course crumbs. In a separate small bowl, whisk together the remaining one egg, remaining milk and vanilla extract and add to the flour mixture, stirring just until the dough comes together. Do not overmix the dough.
Transfer to a lightly floured surface and knead the dough gently four or five times. Divide the dough in half. Pat one half of the dough onto the bottom and up the sides of the pie plate.
In a separate bowl, toss together the cut apples, sugar and cinnamon. Spread the apples evenly over the bottom of the dough in the pie plate.
Roll the remaining dough into a 9 inch (23cm) circle, on a lightly floured surface. Gently place the dough over the apples. With your fingers, seal the edges of the top and bottom crusts. Brush the top of the dough with the egg and milk glaze and sprinkle with white sugar. Cut a slit in the center of the dough to allow steam to escape.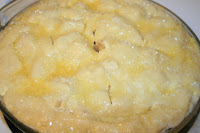
Bake in the preheated oven for about 35-45 minutes or until the pastry is nicely browned and a toothpick inserted into the center of the cake comes out clean.
Serves 6 to 8
Additional notes from Erik: I prefer to freeze my cut butter before working it into the mix, it helps keep it from melting, which is important to scone making. You can also bring this dough together in a food processor to help speed the process of cutting the butter into the flour mixture - I use this same method when I make scones and it works very well. This is a 'rustic' recipe, so don't worry if your crust doesn't look perfect. Lastly, I used 'decorators sugar' instead of regular sugar on the top of the cake - I like the look and crunch of the bigger sugar crystals.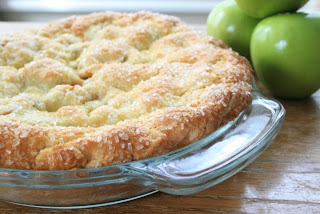
I've found a number of recipes online that claim Irish heritage or at least popularity, but it can be difficult sometimes to sort out the truth from the other stuff out there in cyberspace. Maybe some of my visitors can recommend some good sites for Irish recipes and history?
In the meantime, as I take a short vacation on the Oregon Coast, I begin looking ahead to the
 change in seasons to my favorite time of year - Fall. I love the weather, cool, foggy, crisp, clean. When I sense those changes coming, I can't help but begin thinking of fall cooking - comfort foods - and for me, my favorite Fall ingredient has to be apples. Of course, we can get apples here year-round, but fall is the time when the best of the harvest come in and everyone's thoughts start to turn to baking with apples.
So, looking at my pile of fresh Granny Smiths, and considering how I might explore some of that Irish heritage, I came across a recipe on Joyofbaking.com for an Apple Scone Cake. Now, if the description of this recipe as posted on Joy of Baking is to be believed, the Apple Scone Cake is one of the most popular desserts made by home bakers in Ireland (can anyone confirm that??). It certainly sounded like an interesting recipe to try - and, for all I could tell, seemed as if it could be a real 'Irish' dessert. Why not give it a try? The concept is interesting - it's not really a 'cake' as I would think of it - it's really more of a cross between a cake and a pie. Imagine apple pie, but instead of the traditionally flaky pie crust, a more 'cakey' scone crust instead. Since I'm not yet experienced in the fine art of pie crust, but have successfully made scones, this seemed like a great gateway recipe to my first ever 'pie'
Overall the results were very good. Having made this, I would probably make the following changes the next time around: a bit more sugar/cinnamon in the apples - I used more apples than the recipe called for, but didn't add more sugar to account for that change. Second, I would bake it just a bit longer - I like my apples a bit softer, but this was still pretty good. Third, I might add just a few small pats of butter (not margarine) in with the apples. Lastly, I might add just a touch more sugar to the scone base. With all of that being said, I am including the full original recipe with no modifications so you can start at the same point as me. This is a hearty and tasty dessert - perfect for a cool fall evening - I will definitely be making this again.
Apple Scone Cake (originally from Joyofbaking.com)
2 Cups (280 grams) All Purpose Flour
1/2 Cup (100 grams) Granulated White Sugar
1 Teaspoon Baking Powder
1/4 Teaspoon Salt
1/2 Cup (113 grams)(1 stick) Unsalted Butter, Cold and cut in pieces
2 Large Eggs, Divided
1/2 Cup (120ml) Milk, Divided
1 Teaspoon Pure Vanilla Extract
Filling:
1 Pound (454 grams) Granny Smith Apples, peeled, cored and cut into 1 inch (2.54cm) chunks
2 - 3 Tablespoons (30-45 grams) Granulated White Sugar
1/4 Teaspoon Ground Cinnamon
Garnish:
Granulated White Sugar
Preheat over to 350 degrees F (177 degrees C) and place rack in the center of oven. Butter (or spray with nonstick cooking spray) a 9-Inch (23cm) glass pie plate.
In a small bowl, whisk together one egg and 1 tablespoon from the 1/2 cup milk. Set this aside for later use as a glaze for the top of the cake.
In a large bowl, whisk together the flour, sugar, baking powder and salt. Cut the butter in small pieces and blend into the flour mixture with a pastry blender or two knives. The mixture should look like course crumbs. In a separate small bowl, whisk together the remaining one egg, remaining milk and vanilla extract and add to the flour mixture, stirring just until the dough comes together. Do not overmix the dough.
Transfer to a lightly floured surface and knead the dough gently four or five times. Divide the dough in half. Pat one half of the dough onto the bottom and up the sides of the pie plate.
In a separate bowl, toss together the cut apples, sugar and cinnamon. Spread the apples evenly over the bottom of the dough in the pie plate.
Roll the remaining dough into a 9 inch (23cm) circle, on a lightly floured surface. Gently place the dough over the apples. With your fingers, seal the edges of the top and bottom crusts. Brush the top of the dough with the egg and milk glaze and sprinkle with white sugar. Cut a slit in the center of the dough to allow steam to escape.

Bake in the preheated oven for about 35-45 minutes or until the pastry is nicely browned and a toothpick inserted into the center of the cake comes out clean.
Serves 6 to 8
Additional notes from Erik: I prefer to freeze my cut butter before working it into the mix, it helps keep it from melting, which is important to scone making. You can also bring this dough together in a food processor to help speed the process of cutting the butter into the flour mixture - I use this same method when I make scones and it works very well. This is a 'rustic' recipe, so don't worry if your crust doesn't look perfect. Lastly, I used 'decorators sugar' instead of regular sugar on the top of the cake - I like the look and crunch of the bigger sugar crystals.


Subscribe to:
Posts (Atom)